Introduction
One of the greatest strengths of Dodeca are the many, many, many kinds of functionality that would require scads of code are simply not needed because Applied OLAP has already done all the work and built it into the tool. Whether it be SQL drill through, frighteningly awesome member selectors that you can drive from dimensions, members, SQL, delimited lists, the ability to quickly convert complex Excel workbooks into highly-functional Essbase reporting decks – I could go on and on and I have.But what happens when you need to do something outside of those great pieces of functionality? Yes, Dodeca does many, many, many things, but what about custom stuff? Why thank you for asking, because that is where Workbook Scripts come into play.
What the heck are Workbook Scripts?
That is a very interesting question, and not an entirely easy one to answer. Okay, part of the answer is straightforward -- WS (I am not typing out Workbook Scripts any more in this post) are how you customize a Dodeca View (for the uninitiated, Views are reports/forms/etc., usually, but definitely not always a marriage of Essbase and Excel workbooks as hosted in Dodeca). But WS are not some new age Visual Basic for Applications for Dodeca. They are more akin to Excel’s original Macros (this is pre-VBA) but with multiple twists – WS have their own Essbase/SQL/Excel language, are tied intimately into Dodeca’s event model, and can even directly execute Excel formulas. Did I mention that all of this happens in unison with Dodeca events occurring on the sheet AND all of the functionality and formulas that are intrinsic to Excel AND the Essbase API AND Essbase report scripts AND/OR MDX AND well, you get the idea? It is, in a word, cool.Crawl before you walk
If the above sounds overwhelming, I am doing WS a disservice – they are actually pretty easy to use (that is sort of their point) and a whole bunch of coding that you might have to do in another tool is simply not an issue as Dodeca does it all for you. Probably the best way to show this is an example and per the title of this blog post, I am going to show you how to create a report that dynamically sets the rows to the level zero descendant of whatever off grid/POV Product is selected. To do this I will write an extremely simple two step WS that will:- Read the member selection from the Product treeview POV control
- Run a report script to get the inclusive level zero descendants of that Product
- Dynamically increase or reduce the no. of Products on the sheet
- Retrieve the data from the sheet
A very simple report script
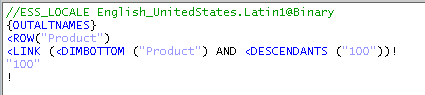
The first step is to write a report script for MVFEDITWWW (aka Sample.Basic) that mimics a drilldown in Excel. I have been writing Essbase report scripts for longer than I care to think, so this was dead easy. You could make this report as simple or as complex as you like – data is not the point, just metadata. Here it is:
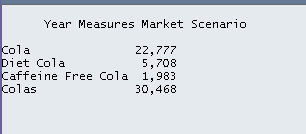
And the output (yes, there is data, no, I don’t care about the numbers, yet):
Tokens to the rescue
If I were writing this report to only do Colas I guess I could stop, but I have a mad lust for power, uh, flexibility, and who knows, I may share this report with someone who is responsible for Cream or Fruit Soda pop, so I am going to remove the member “100” and replace it with the string [T.Product]. See my other posts on Dodeca to explain how tokenization works.Tokens via ScriptText
What matters now is that whatever Product member is selected is what gets put into the report script. To do that, I will change the report and in the WS BuildRangeFromScript method’s ScriptText property I will put in a WS function called TokenValue or @TVal (see what I mean about this looking like Excel 4 and before Macros?). The bits in yellow are the token string [T.Product]. The bits in a sort of horrible brown are the function @TVal(<TokenName>) which make Dodeca value the token before the report script is executed.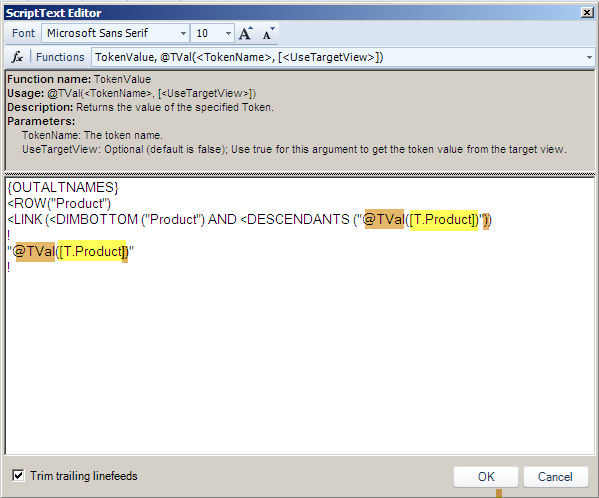
Also note that the whole thing is enclosed in double quotes – this makes sense as the Product name could be Fruit Soda instead of Colas. Remember, Dodeca can pass either the name or the alias, depending on what the user has selected for the dimension control, so the report script has to be accomodate either.
Just to be clear, to make Product tokenized, I put in the WS function and token string of:
@TVal([T.Product]) and encase that within double quotes so that it looks like:
"@TVal([T.Product])"
Ranges R Us
There are three ranges that must be defined for this process to work:- An Essbase retrieve range – where Essbase will retrieve the data (remember, this is the range that we want to dynamically make larger or smaller). This range will get larger or smaller depending on the output of the report script. NB – Make this range one row (or column if this is a column build) longer than it needs to be to get Dodeca to insert rows correctly.
- A template range – a range that is repeated for each member in the output of the script. Formatting, formulas, etc. go in here. If the range is one row in height (which is the usual approach) then just one row will be inserted. If the range is two or ten rows, then that many rows and their contents will be inserted when the row is repeated. Think of this as a quick and dirty method to do multiple dimension drilldowns where the inner dimension is a fixed set of members.
- An Essbase target range – A single cell that tells Dodeca where to stick the copied template range.
Two simple range rules
- The target range must be inside the retrieve range
- The target range must be outside of the template range
Follow the above two rules and you will be happy. Ignore them at your peril – I will illustrate later what happens to Essbase/Dodeca geeks that do not follow those two pretty simple strictures. It’s ugly.
So what does this all look like?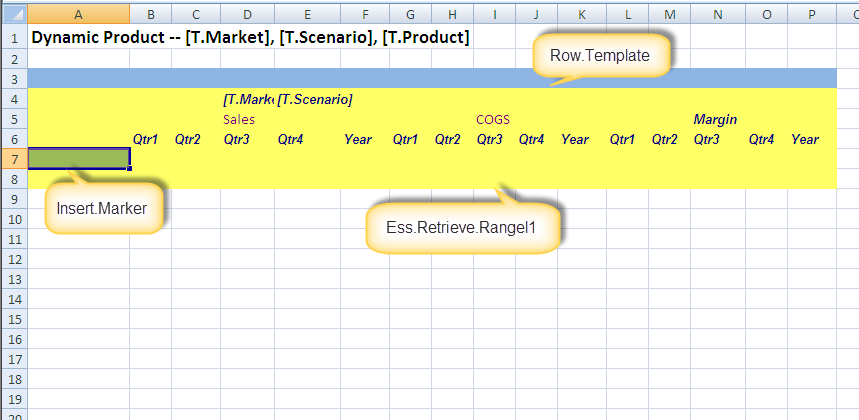
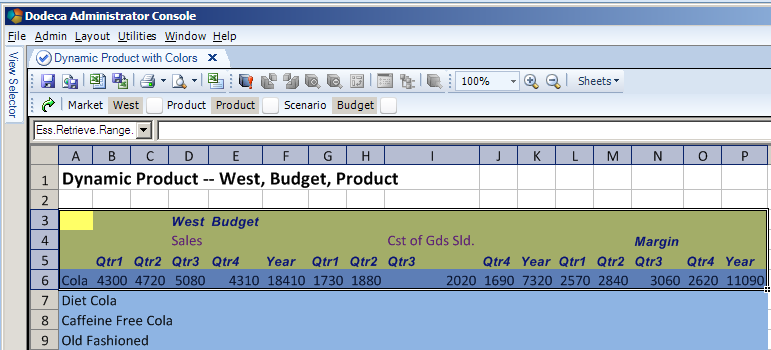
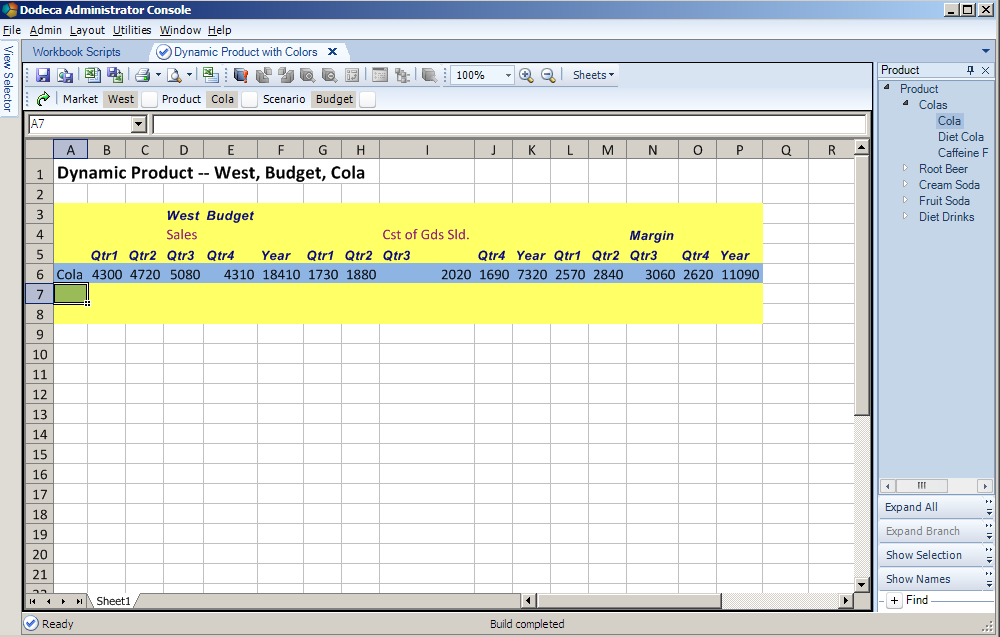
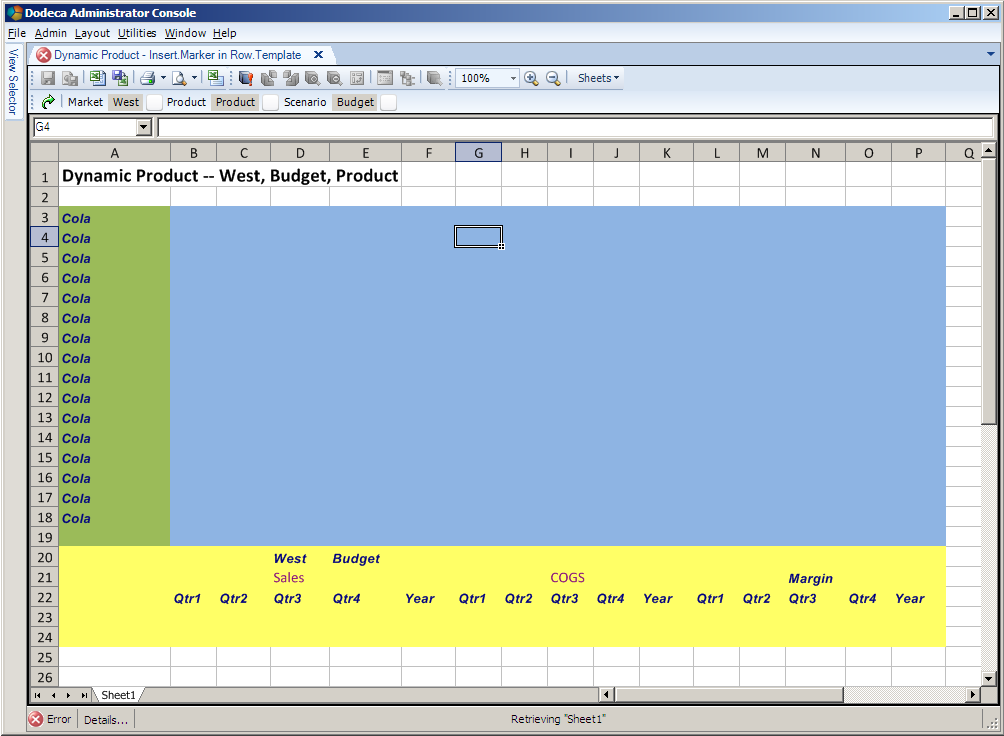
Here’s the View template. Note that there are no predefined members in the row headers – that will be the output of the report script. You will also note the three ranges that I have named (Ess.Retrieve.Range.1 is fixed, but I could have named the other two Platypus and Orange if I wanted to but as I am not totally insane, yet, I chose meaningful names; you should too.) Just so everyone is clear (are you getting the idea that the position of these ranges is important?), the ranges are as follows:
- In green in cell A7 is the target row for the inserted Products. Note that the Insert.Marker range is within Ess.Retrieve.Range.1.
- In yellow from A4 to P8 is the Essbase retrieve range Ess.Retrieve.Range.1. Note that it is one row longer than needed – this is to get the insert function to grow the range, just like in Excel (go on, try it). If you don’t make Ess.Retrieve.Range.1 one row longer than necessary, you’ll get this when everything fires:
Note
that rows have been inserted onto the sheet, but the range
Ess.Retrieve.Range.1 has not been expanded. You Have Been Warned but I
am jumping ahead of the narrative.
- In blue from A3 to P3 is the row template range Row.Template – this is what will get repeated for each selected Product.
Again, note the application of the two range rules:
- Insert.Marker is within Ess.Retrieve.Range.1
- Insert.Marker is outside of Row.Template
Setting the properties
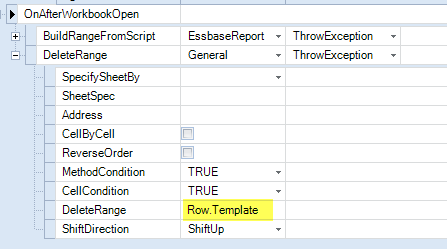
Dodeca helpfully supplies an event called OnAfterWorkbookOpen and just like the name suggests, this is after the workbook is open but before anything has been retrieved. This is the time and the place to set the contents of the row. To do that, this View must have nine properties set – it looks a little overwhelming at first but honestly it isn’t very hard.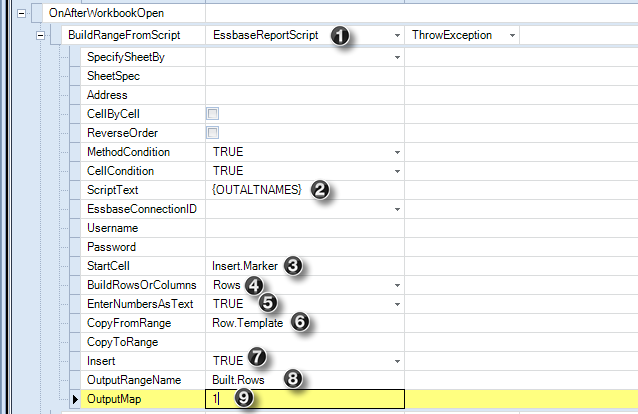
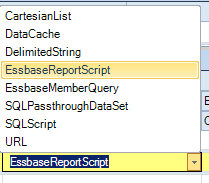
- BuildRangeFromScript -- You must decide how you are to build the row set. I have an older version (I am too lazy/overwhelmed-with-so-many-things-to-do-it-scares-me to download the latest and greatest but I should) of Dodeca, so I am missing the MDX script option. In any case, I want the EssbaseReportScript type.
- ScriptText – The report script text as shown in the ScriptText editor a few sections above must be entered here. Tokens, btw, are not a requirement and indeed when I was proving that this WS worked, I just used the Essbase report script with Product 100. Once I had that working, I tokenized it.
- StartCell – Range name of the repeated rows that are tied to the output from ScriptText. This is the green range.
- Rows – This report has dynamic rows; it could just as easily be columns.
- EnterNumbersAsText – Just in case member names such as 100 are used, treat them as text.
- CopyFromRange – The name of the range to be repeated. This is the blue range.
- Insert – Set to TRUE as I want the output of ScriptText to be reflected in the sheet.
- OutputRangeName – The name of the rows that are built during the insert process.
- OutputMap – The column that receives the output of ScriptText.
Attaching the WS to the View
Once you have written the WS and committed it, simply assign it to the View in the WS property:

Let’s run the view
Diet Drinks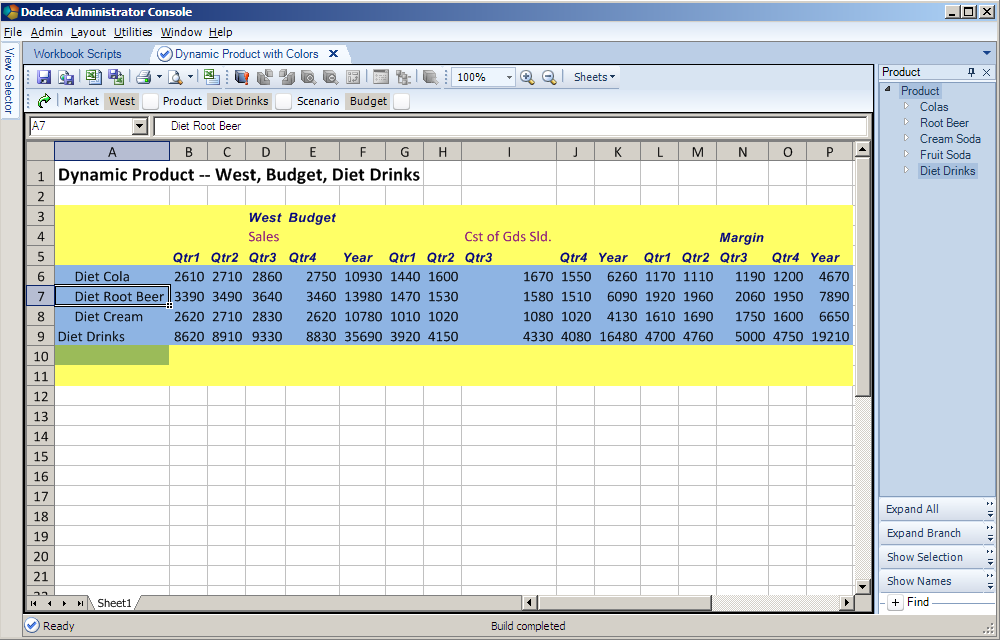
Colas

Cola
All Products
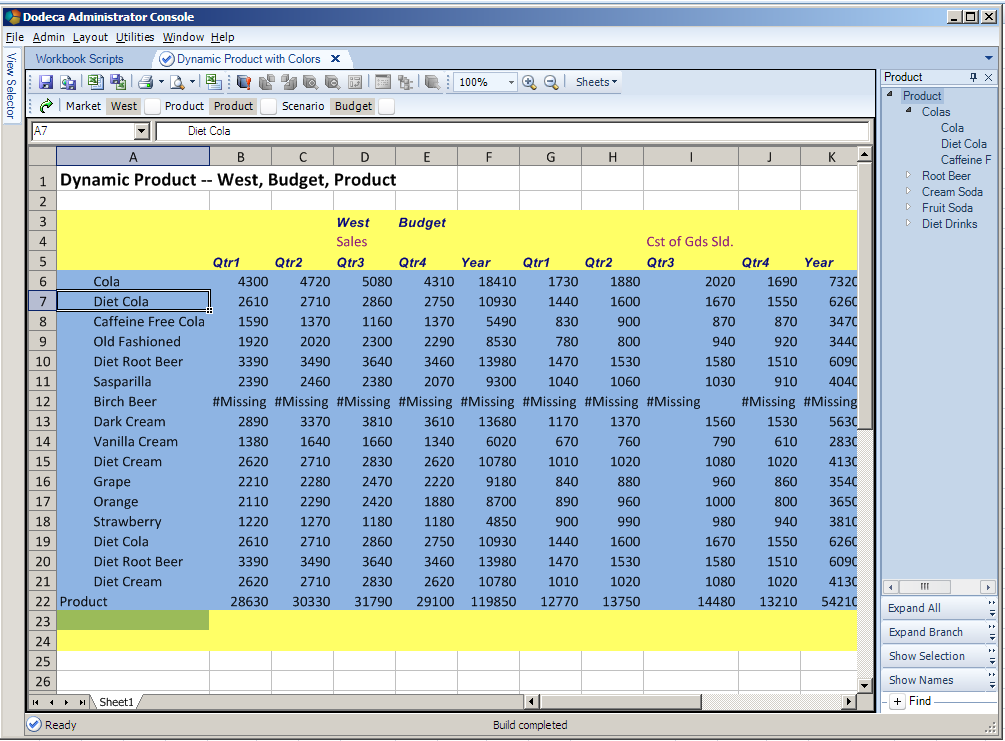
You get the idea from the colored ranges, right? The Row.Template range in blue is repeated and inserted into Ess.Retrieve.Range.1 as many times as there are Products coming out of the ScriptText property. Also note that Insert.Marker gets pushed down as the rows get inserted. Lastly, the Row.Tempate range is no longer in the sheet – I put in a second step into the WS to delete that range once the retrieve was complete.
What users would actually see
And lets look at the same report as the above but without the colors to show the addresses of the ranges post retrieve.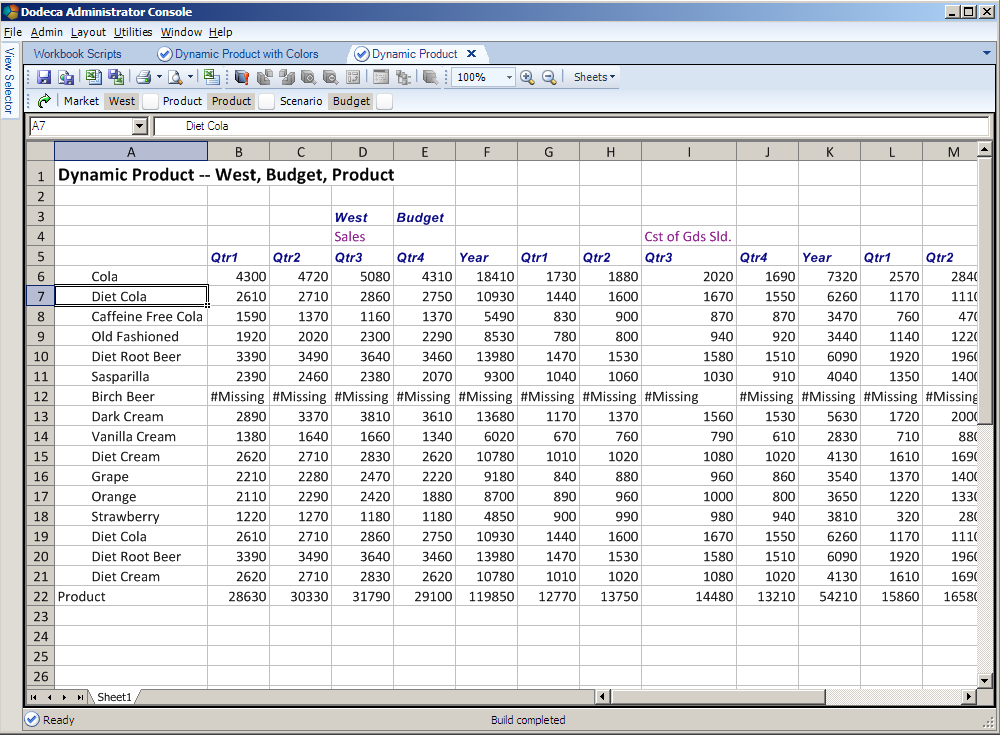
WS can be assigned to multiple views – think of it as a way to build a library of functionality within an application to be used over and over again.
That was easy, wasn’t it?
Think about how you would do that outside of Dodeca with a spreadsheet. Think about all of the things Dodeca is giving you – connections, grids, selectors, tokenization, and now WS. Think about the effort on your part to code all of that. It’s sort of a consultant’s dream, isn’t it, so long as the dream consists of writing enormous amounts of code. I’ve done it in the Classic (nope, now it is Legacy) Essbase Excel add-in toolkit and I don’t ever, ever, ever want to do it again coz I have way more important things to do with my life, like blog, or post on OTN or Network54 or work on “special projects” or prepare content for my three Kscope13 presentations or I dunno, try to have a life. Yep, plenty of other things to do and not one of them includes writing tons of code.Addendum – two examples of what not to do
I could have ended this post right up above but I thought I would save anyone who tries this approach from the errors I committed. And more than that, it really illustrates how this technique works. So with the thought that errors can be fun and educational, and the reminder that you should follow the below two rules at all times, let’s begin.For the record once again (I think this is the third time I’ve written this, so yes, it is important) make your life simple and follow these two rules:
- Insert.Marker is within Ess.Retrieve.Range.1
- Insert.Marker is outside of Row.Template
What happens when you don’t follow those rules? Or, in my case, had the rules explained to you by an ever-patient Tim Tow but then completely ignored them? Pain, that’s what. Let me show you what happens when Insert.Marker is not within Ess.Retrieve.Range.1.
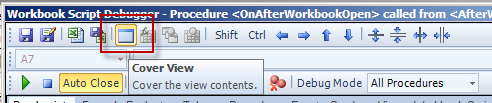
Btw, we can only view this by invoking the WS debugger and then stepping the process. I should note that the only way to see what is on the sheet when there are WS errors is to run the WS in debug mode and then use the CoverView button to display the View. Otherwise, all you get is this:
The CoverView button is on the top toolbar of the debugger.
Error no. 1 – Insert.Marker outside of Ess.Retrieve.Range.1
Assuming that the WS is being stepped, and that the CoverView button has been selected, here’s the sheet before the ScriptText is applied. Note how Insert.Marker is outside of Ess.Retrieve.Range.1.
And we get…KABOOM!
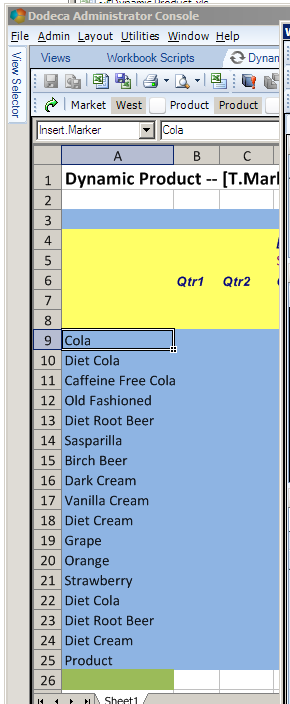
Do you see what happened? The Row.Template got repeated correctly, but the Ess.Retrieve.Range.1 did not get expanded. When that retrieve fires, there will be no Product within the range. The error message is a bit cryptic although if you look at the above range, you’ll realize it makes perfect sense.

Error no. 2 – Insert.Marker within Row.Template
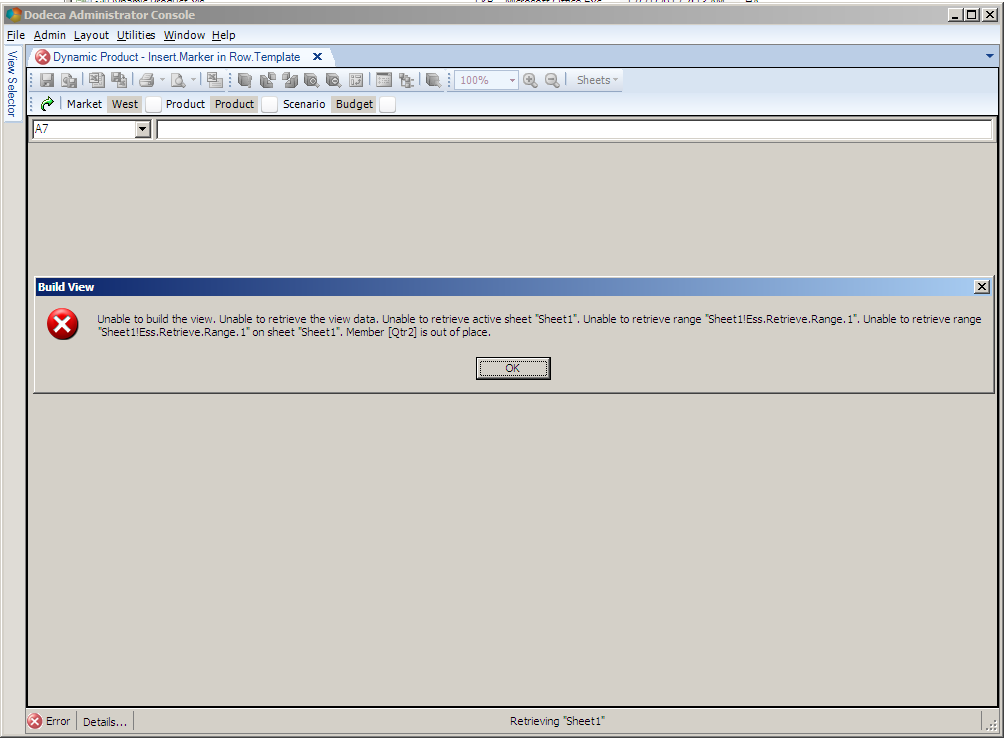
What happens if the Insert.Marker is within the Row.Template? It’s actually quite logical – the ScriptText returns lots of rows one for each product, but doesn’t put the right members in, Dodeca inserts them but they are now within the expanded Row.Template range which gets expanded. Ess.Retrieve.Range.1 is what gets retrieved but it doesn’t have any Products and so you get the below result.
And a nasty error message of:

It’s the same error message (it is the same error from an Essbase perspective) but a completely different looking sheet. Don’t do as I did and all will be well. And use that debug function and even color the ranges if you are confused as to what is where and why.
And now really the end
Beyond user-initiated error, i.e., I screwed up, this is dead easy and takes much longer to read about than it does to set up and run. I think practically every Dodeca customer out there uses WS in one form or another, but like all powerful tools, there is definitely a learning curve. Hopefully I’ve brought you a bit along the way with WS in Dodeca and showed you some of the power. In case you can’t tell, I really like this tool.
Be seeing you.
No comments:
Post a Comment